activate_an_ata
Activate a blue ATA
After you created an ATA account through the portal (see this wiki for how to: Create an ATA account through the Portal), you can now activate your ATA for the first time use. You only need do this once.
There are two ways to activate the ATA for the first time use, through the phone or fax machine handset or through the web interface of the ATA.
Activate the ATA through the phone or fax machine
- Connect the ATA to your network with Ethernet cable using the WAN port on the back of ATA
- Connect the ATA to your fax machine with Telephone cable using the Phone 1 port on the back of ATA
- Connect the ATA to power using the power adapter comes with the ATA
- Wait at least 10 minutes for the ATA to boot up and download all new firmware and settings
- Pick up the phone or fax machine handset, wait for the dial tone, then dial *1*XXXXXX# (XXXXXX is the account ID you got when you create the ATA account through the Portal), then wait, until you hear a female voice annocement, then you can hangup
Activate the ATA through the web interface of the ATA
- Connect the ATA to your network with Ethernet cable using the WAN port on the back of ATA
- Connect the ATA to your fax machine with Telephone cable using the Phone 1 port on the back of ATA
- Connect the ATA to any stand alone computer you have (so to make sure you are not mix the ATA LAN with your LAN) with Ethernet cable using the LAN port on the back of ATA
- Connect the ATA to power using the power adapter comes with the ATA
- Wait at least 10 minutes for the ATA to boot up and download all new firmware and settings
- Go to your stand alone computer, using command “ipconfig” to find out what is the default gateway IP address, usually looks like: 192.168.1.1
- Open any browser on that computer, and go http://192.168.2.1, or the IP address you found in the above step
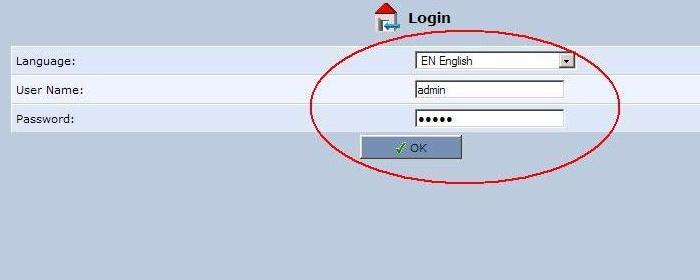
- Log in to the ATA web interface, the default username and password are admin / admin
- Click left side menu “Voice Over IP”
- Click on the last tab named “HTTPS Fax Connections”
- Fill in your Account ID and password, should be the same number, Don't use anything other than that.
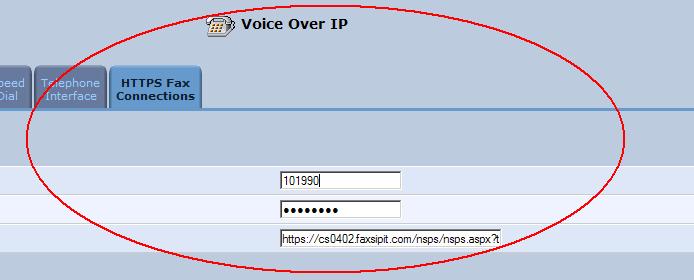
- The login URL is:
https://cs-fsi-01.faxsipit.com/nsps/nsps.aspx?target=cs-fsi-03%%https://ata2.faxsipit.com/nsps/nsps.aspx?target=cs-fsi-02
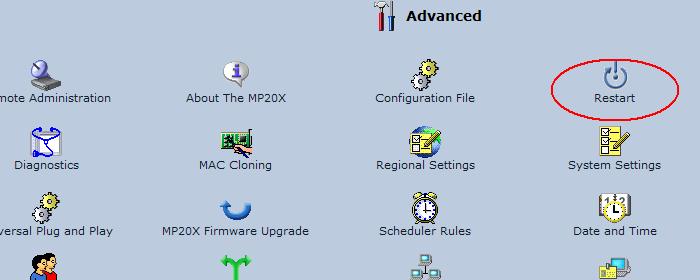
- Click left side menu “Advanced”
- Click on “Restart”, to restart the ATA device and make it activated
- Disconnect the ATA to your stand alone computer from the LAN port on the back of ATA


After waiting 5 to 10 minutes, your ATA should be activated properly. You can test it with any fax number now.
activate_an_ata.txt · Last modified: 2017/04/21 15:51 (external edit)
Page Tools
Except where otherwise noted, content on this wiki is licensed under the following license: CC Attribution-Share Alike 4.0 International
