Action disabled: backlink
create_an_ata_account_through_the_portal
Create an ATA account through the Portal
After you applied an agent account with FaxSipIt, you should have at least the following information ready
- Your agent ID, say it's ID
- Your account log in name, say it's LOGIN
- Your account log in password, say it's PASSWORD
- The URL for you to log into the Portal, usually it looks like: https://faxportal.faxsipit.com/agent.htm (make sure you use this URL every time you want to log into the Portal, for security consideration, this URL will NOT show in the address bar of the browser as it is)
With all the information above, you can easily log into the Portal and create an ATA user. The following steps are for your reference.
- Log into the Portal with your LOGIN and PASSWORD
- Click “User”, then “Create User”, you should get the web page looks like this:
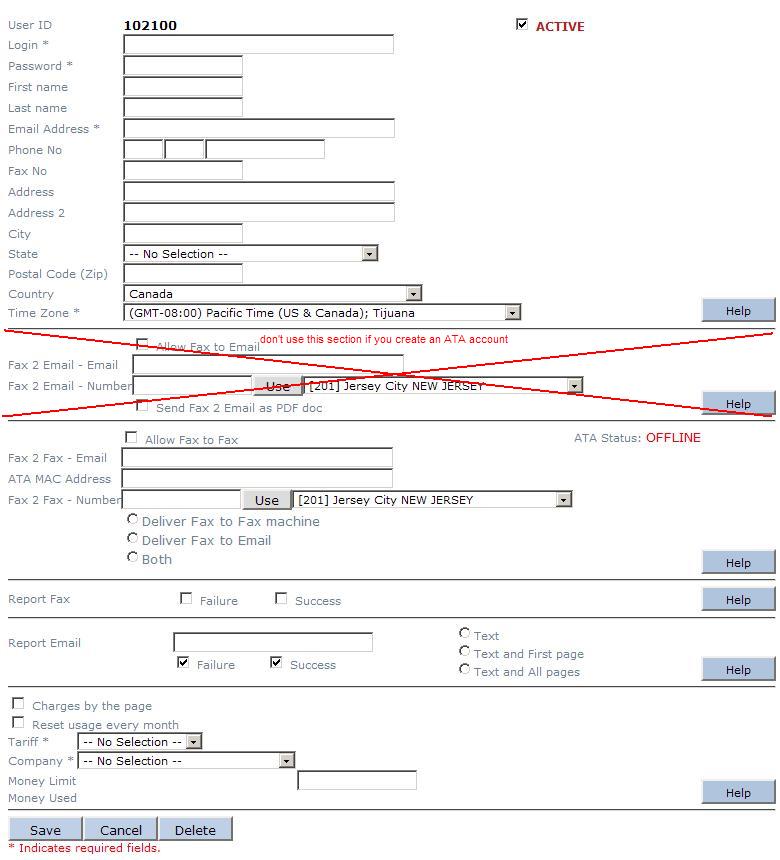
- User ID, is the one system assigns to this account automatically, you need to record it for future use.
- ACTIVE, is checked by default, unless you want to disable this account.
- Login * , is the login for this account, you can choose any login name here as long as it hasn't been used in the system, user's email address is a good choice.
- Password * , is the password for this account, with the login and this password, the user can log into the web Portal by themselves to do something.
- From First name to Country, are the user profile information. They are useful for you to manager accounts (users), but not critical to make this account work.
- Time Zone * , is the time zone the User located, if you choose the wrong one, the fax report comes to the user may have the time stamp confused the User.
- Allow Fax to Email, do NOT tick this, and leave all blank in this section, if you are setting up an ATA account,

- Allow Fax to Fax, you MUST tick this, since you are setting up an ATA account, also called Fax to Fax account.
- ATA Status:, is showing OFFLINE at this stage even you have connected the ATA online already. It only shows ONLINE after you successfully activated the ATA, refer to Activate an ATA
- Fax 2 Fax - Email, is the email address you like to have the fax send to, instead of receiving fax on the fax machine, you can specify this email address, and let the fax go to this email address.
- ATA MAC Address, is the MAX address of the ATA device, it's on the bottom of the ATA box, please record it here correctly. You must have one here in order to make this ATA account work properly.
- Fax 2 Fax - Number, is the DID number this ATA box has, so people can send you fax through this number. You can pick a number available in the inventory by clicking the drop-down arrow, then click on button Use to confirm your choice. Or, you can simply enter the DID number you have it ported to our service. Send email to orders@faxsipit.com to make order or port a DID you like which is NOT in the inventory.
- Options, here you have three options for fax delivering, choose the one you like, but do NOT leave them blank.
- Report Fax, is the option for you to choose whether or not you like to have a “Report Fax” also called notification send to your fax machine. You have choice to request report on Failure fax, or Success fax or both.
- Report Email, is the option for you to choose whether or not you like to have a “Report Fax” also called notification send to your specified email address instead of your fax machine to save paper. You have choice to request report on Failure fax, or Success fax or both. You also have choice to have notification has Text - simple words for report, Text and First page - simple words plus thumbnail of the first page of the fax, or Text and All pages -simple words plus all fax pages sent out. Make sure you do choose one if you request the report, and also make sure you do have working email address entered in the Report Email box
- The rest part is about charges and limitation you can set up for your users.
- Only click Save button will cause the system to process your new configuration. In case you modified any existing account, only Save button will activate the modification.

create_an_ata_account_through_the_portal.txt · Last modified: 2015/04/15 12:36 (external edit)
Page Tools
Except where otherwise noted, content on this wiki is licensed under the following license: CC Attribution-Share Alike 4.0 International
